Implementation
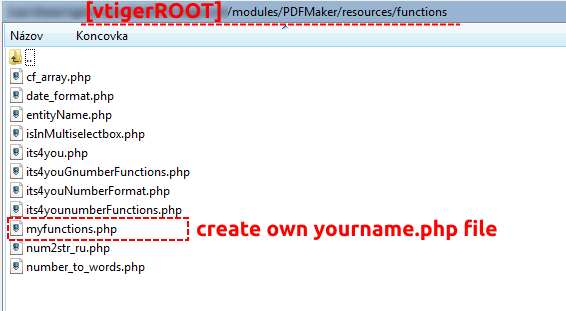
- Go to folder: libraries/jquery/ckeditor and find file config.js
- We need to edit file config.js by removing maximize from the config.removePlugins line and put it to config.plugins line
- So change config.js from:
CKEDITOR.editorConfig = function( config ) {
  // Define changes to default configuration here. For example:
  // config.language = 'fr';
  // config.uiColor = '#AADC6E';
    //vtiger editor toolbar configuration
 		    config.removePlugins = 'save,maximize,magicline';
      config.fullPage = true;
 		    config.allowedContent = true;
      config.disableNativeSpellChecker = false;
      config.enterMode = CKEDITOR.ENTER_BR;
      config.shiftEnterMode = CKEDITOR.ENTER_P;
      config.autoParagraph = false;
      config.fillEmptyBlocks = false;
      config.filebrowserBrowseUrl = 'kcfinder/browse.php?type=images';
      config.filebrowserUploadUrl = 'kcfinder/upload.php?type=images';
 	        config.plugins = 'dialogui,dialog,docprops,about,a11yhelp,dialogadvtab,basicstyles,bidi,blockquote,clipboard,button,panelbutton,panel,floatpanel,colorbutton,colordialog,menu,contextmenu,div,resize,toolbar,elementspath,enterkey,entities,popup,filebrowser,find,fakeobjects,floatingspace,listblock,richcombo,font,format,horizontalrule,htmlwriter,wysiwygarea,image,indent,indentblock,indentlist,justify,link,list,liststyle,magicline,pagebreak,preview,removeformat,selectall,showborders,sourcearea,specialchar,menubutton,stylescombo,tab,table,tabletools,undo,wsc';
 		    config.toolbarGroups = [
 		        { name: 'clipboard', groups: [ 'clipboard', 'undo' ] },
 		        { name: 'editing', groups: [ 'find', 'selection', 'spellchecker' ] },
        { name: 'insert' ,groups:['blocks']},
 		        { name: 'links' },
 		        { name: 'document', groups: [ 'mode', 'document', 'doctools' ] },
 	        '/',
 		        { name: 'styles' },
 		        { name: 'colors' },
 		        { name: 'tools' },
 		        { name: 'others' },
 		        { name: 'basicstyles', groups: [ 'basicstyles', 'cleanup' ] },{name: 'align'},
 	        { name: 'paragraph', groups: [ 'list', 'indent' ] },
            ];

      //Add new custom font names in below array
      var customFonts = ['FreeStyle Script','Brush Script STD','Bradley Hand ITC','Vladimir Script'];
      for(var i = 0; i < customFonts.length; i++){
          config.font_names = config.font_names+';'+customFonts[i];
      }
};
to:
CKEDITOR.editorConfig = function( config ) {
  // Define changes to default configuration here. For example:
  // config.language = 'fr';
  // config.uiColor = '#AADC6E';
    //vtiger editor toolbar configuration
 		    config.removePlugins = 'save,magicline';
      config.fullPage = true;
 		    config.allowedContent = true;
      config.disableNativeSpellChecker = false;
      config.enterMode = CKEDITOR.ENTER_BR;
      config.shiftEnterMode = CKEDITOR.ENTER_P;
      config.autoParagraph = false;
      config.fillEmptyBlocks = false;
      config.filebrowserBrowseUrl = 'kcfinder/browse.php?type=images';
      config.filebrowserUploadUrl = 'kcfinder/upload.php?type=images';
 	        config.plugins = 'maximize,dialogui,dialog,docprops,about,a11yhelp,dialogadvtab,basicstyles,bidi,blockquote,clipboard,button,panelbutton,panel,floatpanel,colorbutton,colordialog,menu,contextmenu,div,resize,toolbar,elementspath,enterkey,entities,popup,filebrowser,find,fakeobjects,floatingspace,listblock,richcombo,font,format,horizontalrule,htmlwriter,wysiwygarea,image,indent,indentblock,indentlist,justify,link,list,liststyle,magicline,pagebreak,preview,removeformat,selectall,showborders,sourcearea,specialchar,menubutton,stylescombo,tab,table,tabletools,undo,wsc';
 		    config.toolbarGroups = [
 		        { name: 'clipboard', groups: [ 'clipboard', 'undo' ] },
 		        { name: 'editing', groups: [ 'find', 'selection', 'spellchecker' ] },
        { name: 'insert' ,groups:['blocks']},
 		        { name: 'links' },
 		        { name: 'document', groups: [ 'mode', 'document', 'doctools' ] },
 	        '/',
 		        { name: 'styles' },
 		        { name: 'colors' },
 		        { name: 'tools' },
 		        { name: 'others' },
 		        { name: 'basicstyles', groups: [ 'basicstyles', 'cleanup' ] },{name: 'align'},
 	        { name: 'paragraph', groups: [ 'list', 'indent' ] },
            ];

      //Add new custom font names in below array
      var customFonts = ['FreeStyle Script','Brush Script STD','Bradley Hand ITC','Vladimir Script'];
      for(var i = 0; i < customFonts.length; i++){
          config.font_names = config.font_names+';'+customFonts[i];
      }
};


 button.


 button and save it.


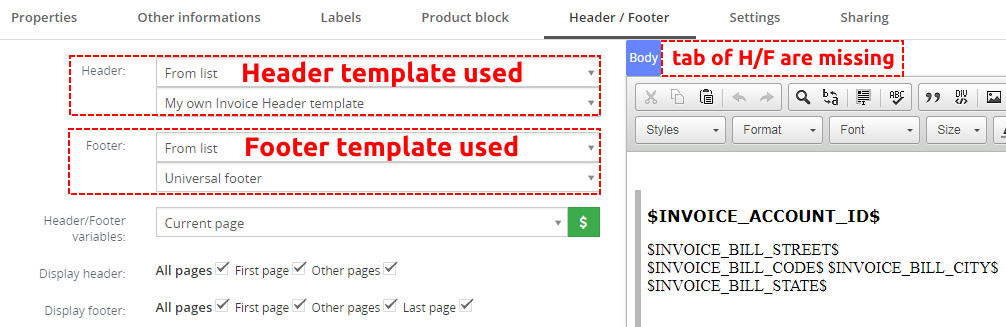
 Maximize button to your Editor.